Learning Yocto — Part 1
If you ask students around IT schools or universities what’s the first Linux-based board they think of, most of them will answer “Raspberry Pi!”. Being this cheap (the Zero model costs around 5$!), more and more people are tinkering with Linux boards building basic weather stations or home automation systems. Part of the merit in this is taken by a readily-available and complete operating system.
As we know, Raspberry Pi comes in fact with a full-fledged Debian operating system. But where’s the fun in using pre-built images? You could instead spend some nights to create your own linux-based operating system! Building the cross-compilation toolchain, managing all that dependencies… sounds difficult, right? What if I told you there’s another way, a much easier way?
The scope of this series will be the creation and optimization of a custom image for a Raspberry Pi board with Yocto. I will be using the Pi2 version but as we will see, there’s not much of a difference for other boards. The Yocto Project takes care of the grunt work involved in this kind of things, leaving the user to the customization of the reference distribution.
It’s big and well-documented project and there is a lot to know about it but, instead of giving you the four hours introduction, I prefer the hands-on approach, that meaning not everything will be discussed in detail. For more detailed answers, refer to the official Mega-manual.
Installing Yocto
Assuming you are already familiar with the Linux command-line and tools like GIT, let’s download Yocto. We will be using the Yocto 2.3 Pyro version. Make sure you have plenty of free space as every package will be downloaded and built here.
Let’s create a new folder and clone the repository.
mkdir -p yocto/sources && cd yocto/sources
git clone -b pyro git://git.yoctoproject.org/poky.git
The root directory of the project will be yocto. In sources we will put the poky distro. Poky is the reference distribution. That meaning that is the basic set of instructions (called metadata) needed to build a custom distribution. It also comes with the building tools included (OpenEmbedded Build system).
One of the strength of Yocto is the ability to customize metadata without modifying the existing files, but creating layers that change existing metadata. Sounds confusing? Let’s see a practical example.
Yocto by default knows nothing about the Raspberry Pi hardware. Instead of manually patching every file, we clone another repository containing the Raspberry Pi BSP (board support package) layer. In the sources directory run:
git clone -b pyro git://git.yoctoproject.org/meta-raspberrypi.git
The meta-raspberrypi layer contains all the information needed to build a toolchain and image for the RPi (think of kernel config, device tree etc.). There are a lot of BSP layers out there, both for amateur and professional boards. There are also layer for packages like mono or for adding Canonical’s snap. You can find a comprehensive index here.
Configuration and building
We have downloaded everything we need for now. Let’s start building something! In the sources/poky directory we run:
source ./oe-init-build-env ../../build

You had no conf/local.conf file. This configuration file has therefore been created for you with some default values. You may wish to edit it to, for example, select a different MACHINE (target hardware). See conf/local.conf for more information as common configuration options are commented.You had no conf/bblayers.conf file. This configuration file has therefore been created for you with some default values. To add additional metadata layers into your configuration please add entries to conf/bblayers.conf.The Yocto Project has extensive documentation about OE including a reference manual which can be found at:
    http://yoctoproject.org/documentationFor more information about OpenEmbedded see their website:
    http://www.openembedded.org/### Shell environment set up for builds. ###You can now run 'bitbake <target>'Common targets are:
    core-image-minimal
    core-image-sato
    meta-toolchain
    meta-ide-supportYou can also run generated qemu images with a command like 'runqemu qemux86'
The script said it created for us a directory that will contain some useful configuration files. Our project directory structure now looks like this:
yocto
├── build                      # Contains tmp files and image conf.
│   └── conf
│       ├── bblayers.conf      # Layers included in the image
│       ├── local.conf         # Image configuration
│       └── templateconf.cfg
│
└── sources
    ├── meta-raspberrypi       # BSP Layer for Raspberry Pi
    └── poky                   # Poky reference distro
Let’s concentrate on the local.conf and bblayers.conf. The first one contains build settings like the board we are building for. The default one is quite instructive since is full of comments, but it could be a bit overwhelming for first timers. Let’s replace its contents with this:
MACHINE ??= "raspberrypi2"
DISTRO ?= "poky"
PACKAGE_CLASSES ?= "package_ipk"
SDKMACHINE ?= "x86_64"
EXTRA_IMAGE_FEATURES ?= "debug-tweaks"
PATCHRESOLVE = "noop"
BB_DISKMON_DIRS = "\
    STOPTASKS,${TMPDIR},1G,100K \
    STOPTASKS,${DL_DIR},1G,100K \
    STOPTASKS,${SSTATE_DIR},1G,100K \
    STOPTASKS,/tmp,100M,100K \
    ABORT,${TMPDIR},100M,1K \
    ABORT,${DL_DIR},100M,1K \
    ABORT,${SSTATE_DIR},100M,1K \
    ABORT,/tmp,10M,1K"
With the first line, we are instructing our next friend Bitbake to build an image for the “raspberrypi2” board. The metadata specific to this board is included in the meta-raspberrypi layer we cloned before, but we have to include it in the bblayers.conf file:
[...]BBLAYERS ?= “ \
 /home/dev/yocto-rpi/sources/poky/meta \
 /home/dev/yocto-rpi/sources/poky/meta-poky \
 /home/dev/yocto-rpi/sources/poky/meta-yocto-bsp \
 /home/dev/yocto-rpi/sources/meta-raspberrypi \
 “
Let’s build the minimal image provided by meta-raspberrypi running bitbake rpi-hwup-imageand go grab some popcorn since it will take a while! On the first run, Bitbake will build both the build system and every package in our image.
Once everything is compiled and packaged, the kernel, the root filesystem and some RPi specific file will be put in build/tmp/deploy/images/raspberrypi2/.
You’ll find a lot of files in here, mostly Device tree blobs and overlays, root filesystem, the kernel, kernel modules and so on. You should have noticed that filenames contain the build date. That’s because by default Bitbake chooses to store every build so you have a history. This behavior can be changed in the local.conf file by adding RM_OLD_IMAGE="1".
Plug the microsd card in your Pc to flash the freshly-built image on it. As always, be extra-extra-careful when executing dd. One letter wrong and your beloved holiday photos will vanish. :)
I’m yet to find out why, but it seems that the sdimg does create a second partition big enough to contain the root filesystem but does not include the ext4 filesystem and the files. So we are flashing the sdimg and then we create the second partition and fill it:
cd build/tmp/deploy/images/raspberrypi2/
dd if=rpi-hwup-image-raspberrypi2.rpi-sdimg of=/dev/sdX bs=4M
mkfs.ext4 /dev/sdX2
mkdir tmp
mount /dev/sdX2 tmp/
tar -xf rpi-hwup-image-raspberrypi2.tar.bz2 tmp/
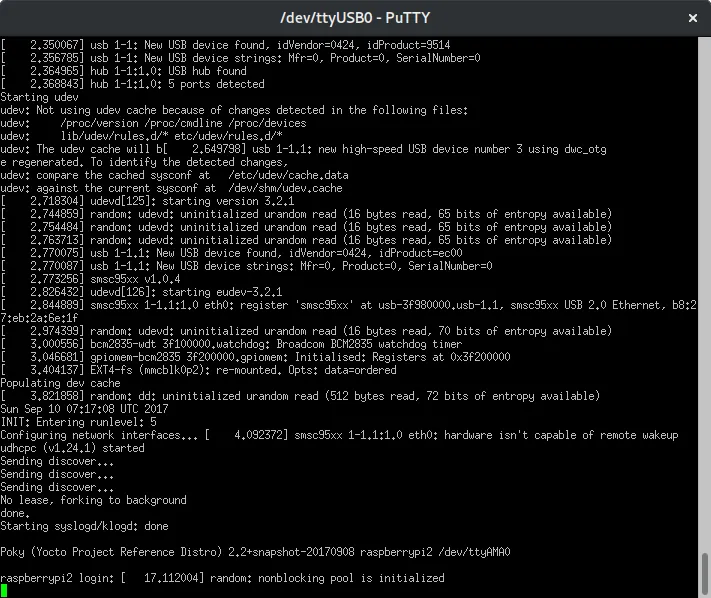
Since network isn’t yet configured — and I’m too lazy to pick up the Tv and plug the hdmi in it — I’m using a USB Uart adapter to capture the serial output. You can find the GPIO pinout here.
And here we are at our first login prompt (with the annoying “nonblocking pool” message):

Isn’t it beautiful?
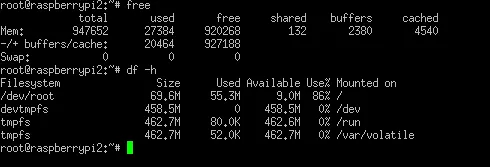
Log in with user “root”, and appreciate how lightweight is our custom distribution:

So, you learned about Yocto and how to build a basic image. Hope you had fun as I did. :) Next topic will be the creation of a layer and the customization of the created image!