Faster .NET development with Skaffold
If you are reading this article right now, chances are that you are probably already deploying .NET applications on Kubernetes, and looking for ways to improve the productivity of yourself or your team.
As much as I love Kubernetes as a deployment platform, it adds some friction to the development cycle. This is especially true for developers approaching container-based development for the first time, but it should not be this way. Ideally, there should be a way to easily set up quickly an inexpensive Kubernetes cluster, and deploy our code to said cluster in the fastest way possible.
Today we will see how to achieve that with Skaffold, a nice tool capable of building and deploying our applications in any Kubernetes cluster. We will focus particularly on .NET applications, trying to reduce as much as possible the build times while keeping it simple.
Example web API project
Though Kubernetes can host any kind of workload, one of the most common use-cases is hosting services that expose RESTful APIs. And what better project suits this purpose than the minimal API template for ASP.NET Core? Let’s fire up our favorite terminal and create a new application based on that template:
mkdir SkaffoldDemo
cd SkaffoldDemo
dotnet new webapi -minimal -o SkaffoldDemo --no-https
Let’s also create a solution, which is nice to have on applications that include multiple projects.
dotnet new sln
dotnet sln add SkaffoldDemo
Cool, we now have the classic API example that also includes Swagger. We can now write an appropriate Dockerfile for our application. Since development time is the main focus of this article**,** we will make it optimized to reduce build times. To do that, we will:
- Carefully place layers to avoid rebuilding the whole application every time
- Leverage some caching tricks made possible by BuildKit
In addition to that, we want to build two different images: one suitable for debugging, that runs non-optimized code and includes the debugging symbols. The other one instead, will be the production-ready image, running optimized code.
If you never heard of BuildKit, it’s a toolkit for building container images, much like the one historically included in Docker. BuildKit is the evolution of the Docker build engine and features many neat techniques to speed up the build process. Docker already includes this new engine, although it is not used by default. To build an image with BuildKit, simply prepend the buildx argument to a standard docker build command, like docker buildx build . .
Writing an optimized Dockerfile
Let’s create the Dockerfile. Every snippet will go in order in the same file but for convenience, we will cover each one individually.
# syntax=docker/dockerfile:1.4
FROM mcr.microsoft.com/dotnet/sdk:6.0 AS build
WORKDIR /src
# Restore Dependencies as a separate layer so that dotnet restore
# will run only if solution/projects change
COPY SkaffoldDemo.sln .
COPY SkaffoldDemo/SkaffoldDemo.csproj SkaffoldDemo/
RUN --mount=type=cache,target=/root/.nuget/packages \
    dotnet restore SkaffoldDemo.sln
First of all, we need to start from the dotnet SDK image. This is quite large since it includes everything that’s needed to build the code (such as the compiler) so we will use this image only to build our application, which will be later distributed on a slimmer base image.
Then we copy only the solution/project files, as these are the only needed files to restore our application’s dependencies. It’s not a case that these steps are done before anything else: BuildKit (and Docker) place each instruction in a different layer. Each time an image is rebuilt, the dependencies of each layer are checked. In this case, the restore command runs only if the solution and project files have changed.
We can use another neat feature included in BuildKit: we can ask it to cache the directory which contains all the packages downloaded by dotnet restore (which resides in /root/.nuget/packages). In case we add/upgrade a reference, only the missing packages will be downloaded, speeding the building process.
#######################################
### Base image                      ###
### (shared between prod and debug) ###
#######################################
FROM mcr.microsoft.com/dotnet/aspnet:6.0 AS base
WORKDIR /app
EXPOSE 8080
ENV ASPNETCORE_URLS='http://+:8080'
CMD ["dotnet", "SkaffoldDemo.dll"]
#######################################
### Production image                ###
#######################################
FROM build AS publish-release
COPY SkaffoldDemo/ SkaffoldDemo/
RUN --mount=type=cache,target=/root/.nuget/packages \
    dotnet publish --no-restore -c Release -o /out/release
FROM base AS release
ENV ASPNETCORE_ENVIRONMENT='Production'
COPY --from=publish-release /out/release .
We can define here a base layer that:
- Inherits from the aspnet runtime image (no compiler included),
- Defines all the common aspects shared by both the debug and production images.
Once we have this base layer, we can build our production application as a new layer (publish-release), and then define the final layer as release. This layer inherits from the base layer and copies the build artifacts from the publish-release layer.
Notice that, to build our application, we need to mount again the NuGet cache layer added before, otherwise the compiler would not find the packages (as they are effectively stored in the cached layer).
#######################################
### Debug image                     ###
#######################################
FROM build AS publish-debug
COPY SkaffoldDemo/ SkaffoldDemo/
RUN --mount=type=cache,target=/root/.nuget/packages \
    dotnet publish --no-restore -c Debug -o /out/debug
FROM base AS debug
# Install basic debugging utilities
RUN apt-get update && \
    apt-get install -y procps && \
    rm -rf /var/lib/apt/lists/*
COPY --from=publish-debug /out/debug .
ENV ASPNETCORE_ENVIRONMENT='Development' \
    Logging__Console__FormatterName=Simple
We can repeat the same process for the debug image with just some tweaks, like installing some basic debugging utilities that will be needed later on in this article.
Before trying to build our application, let’s create a .dockerignore file to avoid polluting our images with build files.
\*\*/bin
\*\*/obj
We can test the Dockerfile by running the following commands:
docker buildx build . --target debug -t skaffold-demo-debug

docker buildx build . --target release -t skaffold-demo-release
We have successfully containerized our application, let’s deploy it to the Kubernetes cluster!
Local cluster setup with Kind
Needless to say, to deploy on Kubernetes we need a cluster. Even better, one that’s capable of running on your development machine. We can achieve this with the help of tools like Kind, Minikube, and others. I’ll use Kind because it’s really quick to install and only needs for Docker to be up and running.
Kind can be installed in many ways, all of which are easily followed from the official docs. To create a cluster, simply run the command:
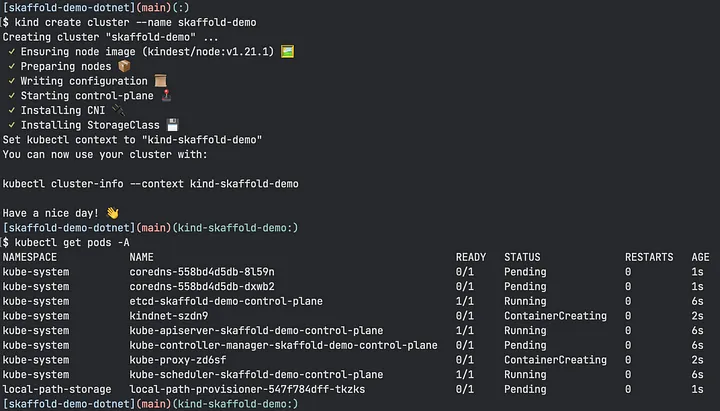
kind create cluster --name skaffold-demo
This command will start a Kubernetes cluster, made by just one node. It also configures our .kube config with a new context called kind-skaffold-demo. Let’s test it by running:
kubectl get pods -A

If everything went well, you should see some control-plane pods starting or running. Now that we have a working cluster and a connection to it, we can finally talk about Skaffold.
Configuring Skaffold
To install Skaffold, you can follow the instructions for your operating system in the official documentation. After the installation is done, we can proceed to configure it.
Love it or hate it, many tools in the Kubernetes ecosystem rely on YAML files for configuration, and Skaffold is no exception. The skaffold.yaml file contains everything it needs to build and deploy our application. In our case, the bare minimum to run it would be something along the lines:
apiVersion: skaffold/v2beta27
kind: Config
metadata:
  name: skaffold-demo
build:
  local:
    useBuildkit: true # We use BuildKit
  artifacts:
    - image: skaffold-demo
      docker:
        dockerfile: Dockerfile
        target: debug # deploy the debug image
deploy:
  kubectl:
    manifests:
      - deploy/skaffold-demo.yaml # resources to be created on k8s
This file is pretty self-explanatory, except for two things:
- We want to deploy the debug image, specifying the target
- We also need to deploy some Kubernetes resources to the cluster
On the last line, another yaml file is referenced. This file will contain the Kubernetes resources necessary to deploy the application on the cluster, like a deployment. Where to put this second file is a matter of preference. I like to keep them separate from the code, so I would put it in the deploy directory.
apiVersion: apps/v1
kind: Deployment
metadata:
  labels:
    app: skaffold-demo
  name: skaffold-demo
spec:
  replicas: 1
  selector:
    matchLabels:
      app: skaffold-demo
  template:
    metadata:
      labels:
        app: skaffold-demo
    spec:
      containers:
        - image: skaffold-demo
          name: skaffold-demo
          ports:
            - containerPort: 8080
              name: http
---
apiVersion: v1
kind: Service
metadata:
  name: skaffold-demo
spec:
  selector:
    app: skaffold-demo
  ports:
    - port: 8080
      name: http
Every time we ask Skaffold to run our application, it will:
- Build our Dockerfile
- Deploy the image on the cluster (either directly or to a repository)
- Create the Kubernetes resources in deploy/skaffold-demo.yaml
- (Optionally) opens a port-forward towards the newly created pod
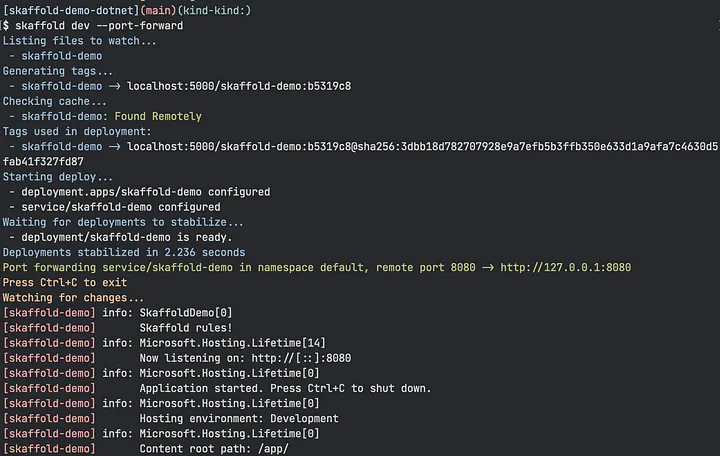
Let’s see it in action by running the command:
skaffold dev --port-forward

This will take longer the first time we run it as Skaffold will need to rebuild the image. Subsequent runs will be much faster.
We can browse our API by opening a browser to the http://localhost:8080/swagger URL.
Notice that Skaffold is watching for changes (on every file/directory used by the Dockerfile). Every time we make changes to the code, Skaffold will rebuild and relaunch it in a matter of seconds. Redeploying the application after a small change to the code takes about 11 seconds on my machine, a big improvement over my old workflow that required at least 40 seconds.
Stopping Skaffold (by pressing CTRL-C) will also delete the resources created by it. To keep the deployment running in the cluster, we can run the command:
skaffold run
Everything we saw here also applies to remote Kubernetes clusters, but with a caveat. On many local clusters, Skaffold is able to push the built images directly on the node. On remote clusters not only this is not supported but is even undesirable as it would pose a security risk. In this case, we need to push the image to an external image repository and configure the deployment appropriately. This will be inherently slower since the image will be pushed to the registry, and then pulled again by the cluster to run it.
I hope that this article will help you overcome some of the annoyances found when building applications on Kubernetes. Skaffold is just one way of doing it, but it is a mature and well-adopted tool that gets the job done.
Like any other good tech article out there, you can find the example project on GitHub.
👋🏻 Till the next one!